Search Manual
RealBand® 2019 for Windows® New Features Guide
Details of New Features
New toolbar background color and icon set
The new toolbar background color and icon set is available. You can select either the new or old icon set from the menu Options | Icon Set.

Notation Window - Space bar to play from the current time location
Pressing the space bar in any mode plays the song from the current location. Previously, it played the song from the beginning of the current bar.

Notation Window - Double-click to play from the current time location
Double-clicking on the Standard mode Notation window (or on the time line in Editable or Staff Roll mode) plays the song from the current time location. Previously, it played the song from the beginning of the current bar.
Notation Window - Quick change of the beat resolution
The right-click menu in the Editable or Staff Roll mode has an option to change the current beat resolution. Previously, the only way to do this was to right-click on the time line.

Notation Window - Easier entry of a note on the stave line>
Clicking close to a stave line will put a note on the stave line instead of between stave lines. Previously, you had to click extremely close to a stave line to insert a note on it.
previously: |
now: |
Notation Window - Clefs split point asterisk
In the Notation Windows Options dialog, the clefs split point asterisk indicates that C5* is middle C.
![]()
Notation Window - Spin control to set the clefs split point
The clefs split point can be set by the spin controls.
![]()
Notation Window - Quick entry of forced accidentals from the right-click menu
You can quickly enter forced accidentals from the Notation window right-click menu. Previously, you could only enter them from the Note Edit dialog.

Notation Window - “N” Keystroke Entry Mode
There’s a keystroke entry mode - the “N” mode, which lets you enter a melody entirely using keystrokes. The keystrokes are N to enter a note, up/down cursor to change its pitch, and left/right cursor to move the time line.
Hit the [N] key to enter a note at the current time line. |
While the note is highlighted, use the up/down cursor keys to change its pitch. |
Use the right/left cursor keys to move the time line. |
Hit the [N] key to enter a note at the current time line. |
|
|
|
|
Tracks Window - Ctrl key to zoom in/out vertically
Tracks Window - Holding the Ctrl key while using a mouse scroll wheel, or holding the Ctrl key while pressing the +/- buttons on the Tracks Window tool bar zooms in/out the window vertically.
Tracks Window - Vertical grid lines drawn on the track overview
Vertical grid lines are now drawn on the track overview.

To change the resolution or hide the grid lines, right-click on the window, and use the Grid lines menu command.

Tracks Window - Snap to grid lines instead of beats
When the vertical grid lines are drawn and the “Snap” feature is enabled, clicking on the track overview will snap to grid lines instead of beats.

Audio Edit Window - Vertical grid lines drawn
Vertical grid lines are now drawn in the Audio Edit window.

To change the resolution or hide the grid lines, click on the window, and use the Grid lines command.

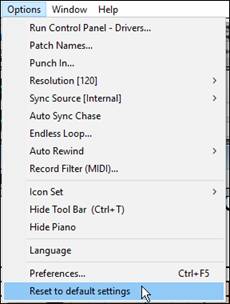
Reboot the program with default settings
Options | Reset to default settings will reboot the program with default settings.
|
|
Drum Notation Support
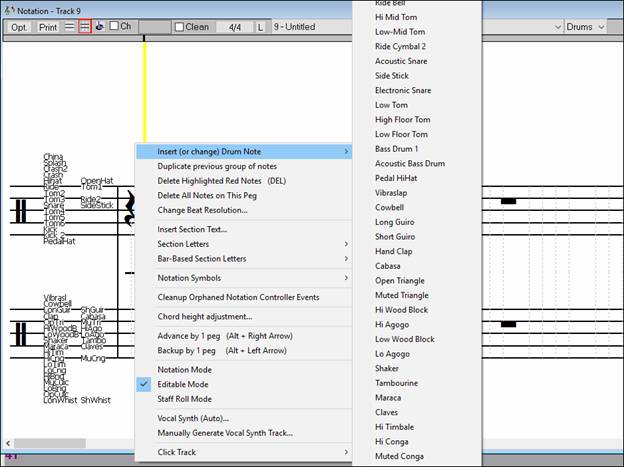
When the track type is set to Drums with the combo box on the Notation window tool bar, drum notation will display.

|
In the clef area, you will see a guide telling you what drum notes are used in that line of notation (e.g. Kick, Snare, HiHat). |
When the track type is set to Drums, you can enter drum notation to the track. Right-click on the Editable or Staff Roll mode Notation window, and use the Insert (or change) Drum Note menu item. For drum notes shown on the left in the drum guide, you can also click on the corresponding vertical position of the drum note you want.
Mixer Window - Ctrl key + moving the volume slide to change the value by 1
Mixer Window - Holding down the Ctrl key while moving the volume slider with the mouse will increase/decrease the value by 1 instead of greater amount.

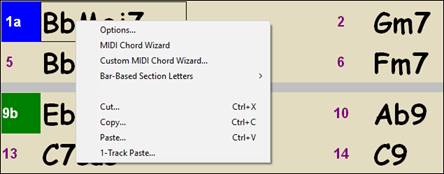
Chords Window - Copy, cut, paste commands in the right-click menu
The right-click menu on the Chords window now has copy, cut, and paste commands.
Event List Window - Shift-click to extend either the start (From) or end (Thru) of the selected area
In this example, we shift-clicked on the last row in the list to extend the end point from 2:04:000 to 3:04:093.
|
|
|
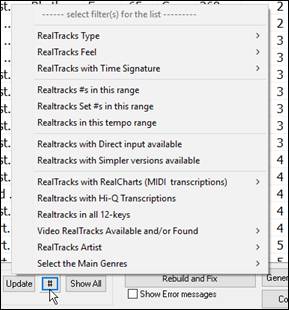
Advanced Filter to Search for RealTracks, RealDrums, and MIDI SuperTracks
A useful filter [#] button has been added in RealTracks Picker, RealDrums Picker, and MIDI SuperTracks Picker dialogs.

| It allows you to filter the list by many elements including:
|
|
This example shows that the list is filtered to show the swing 8th ballad RealTracks played by Oliver Gannon.

The filter [#] button in the RealDrums Picker works like the one in the RealTracks Picker. It includes a drums specific option, which can filter by RealDrums transcriptions (notation).

Song Titles Browser Enhancement
We’ve added 300 more song titles including requests from users, so there are now over 10,600 titles.

The chord density filter is available. Press the [Other] filter button and select one of the menu items below Filter by Chord Density. For example, you can search titles with chord changes in every 1-4 beats.
![]()

You can also filter the list by chord complexity. This is scaled by 1 to 10; 1 means simple with few chord changes and 10 means complex with many chord changes. Press the [Other] filter button and select one of the menu items below Filter by Chord Changes.
![]()

The memo area displays chord density and complexity for the selected title.

StylePicker - Style rebuild advise within the window
If the style list needs rebuild, it tells you this within the StylePicker, instead of a message that requires a response.

StylePicker - Progress bar for the style list rebuild
While the style list is being rebuilt, you can see the progress inside the StylePicker. Previously, the progress was shown in the yellow flash messages at the bottom right of the screen. Now, in addition to that, it will be shown in the progress bar at the top of the StylePicker. Moreover, the rebuild is faster than before by 75%. It takes 1/4 of the time now.

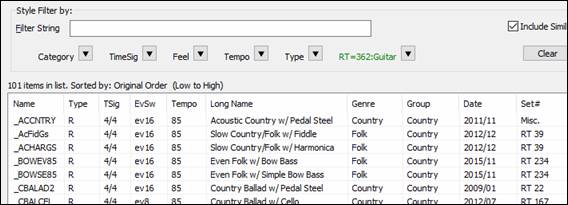
StylePicker - Filter by specific RT/RD/MST or RT/MT|ST in a range
The style list can be filtered by a specific RealTracks/RealDrums/MIDI SuperTracks or RealTracks/MIDI SuperTracks in a certain number range.
To use this feature, press the [Other] filter button in the StylePicker. If you want to find styles that use RealTracks #362, for example, select Styles that contain a specific RealTracks or MIDI SuperTracks from the menu.
![]()

When the dialog opens, select 362 and press OK.

The list will be filtered to show styles that contains RealTracks #362.
StylePicker - Filter by Xtra Styles set
You can filter the list by an Xtra Styles set. Press the [Other] filter button and select Show Xtra Styles Set Only.
![]()
![]()
This will open the Choose Xtra Styles Set for Filter dialog.

Select from the list and press OK. The StylePicker will then list styles that are included in the selected Xtra Styles set.

StylePicker - List all styles in the default display
The StylePicker can list all styles (including N/A styles) in the default display.
Previously, you could see all styles including N/A styles by enabling Show ALL Styles including N/A (not found) Styles in the [Other] filter button menu, but pressing the [Clear] button reset the list to show only available styles.
Now, with a new option, you can see all styles including N/A ones even when all filters are cleared. To use this feature, press the [Action] button and select Set Dialog Options. Then, In the StylePicker Options dialog, enable the Default display should include all styles (available and N/A not available) option.
![]()
![]()
Unconditional 30-Day Money Back Guarantee on all PG Music products purchased from PG Music Inc.
PG Music Inc.
29 Cadillac Ave Victoria BC Canada V8Z 1T3
Sales: 800-268-6272, 250-475-2874,+ 800-4746-8742*
* Outside USA & Canada where International Freephone service is available.
Access Codes
Tech Support: Live Chat, support@pgmusic.com
 Online now
Need Help?
Customer Sales & Support
|
Phones (Pacific Time) 1-800-268-6272 1-250-475-2874 |
||
| Live Chat | ||
| OPEN | Online Ordering 24/7 |
|
| OPEN | Forums, email, web support |


